


Breaking News
 House Narrowly Passes $1.15 Trillion Defense Bill That Integrates US Military Tech...
 Getting Away with Murder: Under Trump, the Buck Stops Nowhere
 The AI Bubble Is Going To Burst, And When It Does You Can Say Goodbye To High Stock Prices
 JUST IN: Trump Says US Will Destroy One Bridge or Power Plant "Any Time Iran Shoots at a Ship&q
Top Tech News
 Anthropic is launching its own drug discovery programs for rare diseases using Claude...
 SpaceX AI Satellites Will Have 250 Kilowatts of Power
 Chinese researchers have developed a sodium-metal battery that can fully charge in just 4 minutes...
 SpaceX Starship Flight 13 in 3 Days - Thursday July 13
 Chinese Scientists Develop Nuclear Battery Using Carbon-14
 Teleoperated humanoid robots complete first-ever live surgery
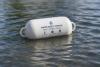 Floating capsule auto-disinfects water without chemicals or battery
 Modular Reactors To Solve Data Center Hysteria?
 DeepSeek Developing In-House AI Chip In Bid To Cut Nvidia Reliance
 America just took three brand-new nuclear reactors critical in thirty days, a first for any...


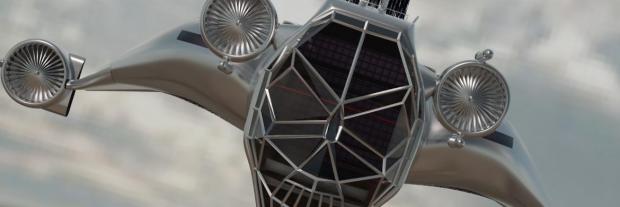
3D Printing The Precariat - PiratesWithoutBorders Ship
https://forums.pirateswithoutborders.com/viewtopic.php?t=68

Postby cameron » Sat Dec 09, 2017 2:23 am
I know people have asked for STL files for their 3D printers. I tried creating an all-in-one manifold mesh that could be printed as one part, but it's way too difficult (I'd end up redrawing the entire ship again). I figured I should wait until the final design is nailed down (detachable cargo, etc.).
But I can post what I have to give you something to play with. There are 3 STL files posted here. One with the main body with all it's components. Another with the solar panels expanded. And a 3rd of the solar panels collapsed.
The files aren't perfect, but you can try using your 3D printing tools to separate and close the meshes. Please post your progress (with pictures!). Good luck.
Postby cameron » Sun Jul 07, 2019 12:17 pm
Have been trying to manipulate the Precariat model for 3D printing (even though I don't own or have access to a 3D printer). Hoping people can test printing these files on their hardware and post photos.
Used Meshlab (meshlab.net) to "clean up" the model and reduce complexity to something more friendly to 3D printing. Then used Slicer (slic3r.org) to simulate setting up for 3D printing.
Since the model is irregularly shaped with no flat surfaces, I cut it into 3 pieces so it can be printed with minimal support material and be assembled after printing.
All the OBJ files are here https://precariat.us.to/3DPrinting
The lower section is here. It is printed upside down, so there is maximum material on the print bed. Some support material (shown in green) is required to support the main fans. If you rotate 45 degrees, you can get the most space from your print bed